28 February 2007

wiring loom / arnès elèctric

As I told you in the previous post I had to rewire tail lights, brake lights, turn signals, and put some extra wire for additional gauges and fog light. Well, here you have the home-made-wiring-loom I made myself, ready to install...

Com ja he dit en el post anterior haig de tornar a passar els cables de llums del darrera, llums de frè, intermitents i alguns extres per a rellotges adicionals i llum de boira que posaré més endevant. Bé, doncs aquí teniu l'arnès-caseru que m'he fet, a punt per instal·lar...

If you want to do a good job you must begin at the paper...
Si vols fer un bon treball has de començar al paper...

Some bifurcation details, note the wiring cover before and after heat apply.

Alguns detalls de les bifurcacions, noteu com és la funda dels cables abans i després d'aplicar-l'hi la calor...


Where brake wiring will exit the loom...

On el cable de la llum de frè surt de l'arnès...

I used an electrician special tool to pass wiren insede wire pipes and worked fine... If not, it is impossible to put 7 wires inside the cover...

He utilitzat un pasacables de nylon per passar els cables per dins la funda... si no, és impossible posar 7 cables dins la funda...

Avobe the tools used (basic the crimping tool, the nylon wire-passer and the termo-retractile cover) and below the result.

A sobre les eines utilitzades (bàsic la grimpadora, el passacables de nylon i la funda termoretràctil), a sota el resultat.

25 February 2007

At last... / A la fí...

Well... at last the gremlins are gone... Finally after two whole weekends of desesperation and brain braking I had to turn to my father, the voice of experience (and a mechanic since he was 15, now 62... very important too).

After 20 minutes checking grounds and connecting tail lights wires direct from light switch and other tests he said: "Park light wires and turn signal wires are short circuited at some point in the harness for sure, try to connect an outside test wire direct from the tail light pins at the fuse box to the rear housings"

We made a quick test-set from some speaker wire ant connect it and...
E-U-R-E-K-A!!!!!!! Problem fixed.

As I have to rewire the brake light wire to convert to euro tail lights I will take the advantage and rewire turn signal, park light and a pre-installation for some gauges (rpm-counter, oil temp and battery charge)...

After this sermon I would like to thank all who helped me at thesamba (and who tried to...) and, of course, my father.

-------------------------------------
A la fí els gremlins han marxat... Després de dos caps de setmana sencers de desesperació i cervells trencats he hagut de recórrer al meu pare, la veu de l'experiència (i mecànic des dels 15 anys, ara 62, molt important també).
Després de 20 minuts fent proves de massa i connectant els cables dels pilots del darrera directament a l'interruptor de llums ha dit: "Segur que els cables dels intermitents i de les llums estan pessigats a algun lloc i fant curt-circuit, provem de connectar un cable per fora des del sfusibles fins als pilots a veure què passa".
Hem fet set de proves amb uns cables d'altaveus, els hem connectat i... E-U-R-E-K-A!!! Problema solucionat.
Com que hauré de passar cable per les llums de frè aprofitaré per passar cables nous de intermitents, llums posició i una preinstal·lació de cables per un comptarevolucions, un rellotge de tª de l'oli i un de la càrrega de la bateria.

Bé, després d'aquest sermó m'agradaria agraïr a tots els que m'han ajudat des de thesamba (i els que ho han provat...) i, per descomptat, al meu pare.

My father doing his best!

After cutting the wiring loom I did an autopsy and found the problem, my father was right, turn signal and park light wires was kissing...

Despés de tallar l'harnès he fet una autopsia i he trobat el problema, el meu pare tenia raó i els cables de llums i d'intermitents es feien petonets...


The workshop / El taller


Improving Safari / Millorant les Safari


On the top the rusty brackets, in the middle after sanding and above the brackets primered.
A dalt de tot els suports rovellats, al mig després de lijar-los i la després de impromar-los.


The dash mount brackets were also missing, I put a set of SS from Creative Engineering, best quality.

Els suports del 'salpicaderu' tampoc hi eren, he posat uns d'inox de Creative Engineering, la millor qualitat.


20 February 2007

Euro Taillights / Pilots europeus


The tail light housings I purchased in a local workshop, these are Hella, but cannot say if from a split or a early bay.

Els pilots que he pillat en un taller, son Hella però és impossible saber si de T1 o de T2a.

Turn signal switch / Interruptor intermitents

'67 was a also a special year for being the year that the dimmer switch changed from the floor to the turn signal switch. Our bus came with a non-'67 turn signal switch, so you couldn't switch from high to low beam.

El '67 també va ser especial perquè el canvi de llums va passas dels peus a la palacna d'intermitents. La nostra furgo venia amb un interruptor d'intermitents anterior al '67 de forma que no es podia canviar de llargues a curtes.

Brand new WW repro...
Repro WW nova de trinca...

The wrong switch hanging under the steering wheel and the new switch and laptop on the passenger seat.

L'interruptor incorrecte penjant sota al volant i el nou i el portàtil al seient del copi.

The switch that was removed, note that the hole where the lever exits from the assembly don't allow vertical movement to switch lights.

L¡interruptor que vaig treure, es veu que el forat per on surt la palanca no permet el moviment vertical per poder canviar les llums.


Our nephew Adrià testing the assembly, he knows perfectly how to use... If the lever resisted that attack then it would resist everything.

El nostre nebot Adrià probant el muntatge, ell sap perfectament com fer-ho servir... Si la palanca va aguantar aquell atac llavors ho resistirá tot.

Wipers / Netejaparabrises

The bus came with safaris but no wipers, cheap option when installing ones :|
I asked Ludo I wanted the bus with wipers in working order but he only did half job, only one used wiper and the wiper disengagers (allows wipers disengage from shaft and then rest in the 'one eye duck').
With the WolfsburgWest order I recieved a wiper arm, a wiper blade and a 'one eye duck' with screw.

La furgo venia amb les finestres safaris però sense netejaparabrises, li vaig demanar al Ludo que n'instal·lés uns però només va fer la meitat de la feina... només un neteja parabrises usat, els desconnectadors (que permeten desconnectar els limpies del seu eix i que aquests reposin a 'l'ànec d'un sol ull').
Amb la comanda de WW vaig rebre també un braç i una fulla de netejaparabrises i 'lànec d'un sol ull' amb el seu cargol.


Wiper arms and blades are WolfsburgWest repros.
Els limpies son reproduccions de WW.

Do you understand the name of 'one eye duck'?
Enteneu ara perquè es diu 'ànec d'un sol ull'?

The silver one came with the bus and the black one is a WW repro, 25 cm Vs. 30 cm.
La fulla negra és la repro de VV, de 30 cm, contra la platejada de 25 cm.

Ready!

19 February 2007

Dimmer relay goes to the operating room / Relé de llums al quiròfan

After installing turn signal switch I realised the lights didn't switch from low to high beam...
Un cop instalat l'interruptor dels intermitents em vaig adonar que no canviava de curtes a llargues...

Diagram in hand (in laptop) when installing the turn signal switch from WolfsburgWest
Amb el diagrama elèctric a la mà (al portàtil) mentre instal·lava l'interruptor de WolfsburgWest


The dimmer relay at the operating room, below how it works... amazing! This is an old school relay, when moving the lever then the coil act as a magnet and combined with a mechanical device switches between two pins.

El relé de llums al quiròfan... a sota com funciona, espectacular. És un relé mecànic, quan actua la palanca de llums la bobina fa d'imán, que combinat amb un mecanisme commuta entre dos pestanyes.


18 February 2007

Parklights / Llums de posició

Sealed beam US headlights upgraded to H4, I decidet to make working the old parklights...
Llums de 'feix setllat' estil americà actualitzats amb làmpades H4, he decidit fer funcionar les antigues llums de posició...


Mok Mok!

Driving the bus so low is a problem because is very easy to hit the steering box. Hitting the steering box is not good, of course, but when it happens be sure your horn wire will be cutted.

Portar la furgo tant baixada és un problema perquè és molt fàcil tocar amb la caixa de direcció al terra. Quan això passa gairabé segur que el cable de la bocina es talla.


Ready to Mok Mok!

Little driver


Windshield washer system / Sistema neteja parabrises


The Kit

Left: Hella-VW jet Right: the SWF jet from the kit, 2 jets to improve windshield cleaning
Esquerra: Boquilla Hella-VW Dreta: La boquilla SWF del kit, millorada amb dos boquilles.

Ready to pump!

The 12 Volt sticker showing dash OG paint.

L'adhesiu de 12 volts demostra que la pintura del 'salpicaderu' és original.


15 February 2007

Westy curtains / Cortines westy

PO said curtains were OG... I'm trying to know if it is true... but seems to be true.
L'antic propietari em va dir que les cortines eren originals, estic investigant... però sembla cert.


13 February 2007

Parts from WW / Peces de WW


Recieved 1st order from WolfsburgWest.
-------------
Rebuda la primera comanda de peces de WolfsburgWest.

[ ... ]

No comment

Passenger seat / Seient copilot

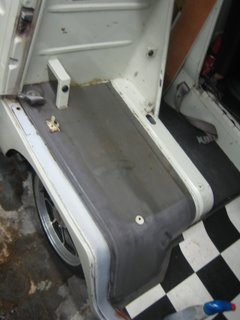
The seat pad under the passenger seat cover is in a poor state (in a 40 years old pad it's normal) so I remove the seat and cleaned the mat under the seat. I realised that those mat was OG, with the VW logo and the 211... number stamped. But due to dirt some PO painted the visible part of the mat so now you see a two tone grey mat. The shape is perfect, only a washing was enough.

El farciment del seient del 'copi' està bastant malament (en un farciment de 40 anys és prou normal) així que vaig desmuntar el seient i vaig netejar l'alfombra que hi ha sota. Llavors em vaig donar compte que aquesta alfombreta de goma és també original ja que té el logo VW i el nº de recnavi estampat. Suposo que degut a la brutícia que hi havia algun propietari va pintar la part visible de gris, així que ara és una alfombreta amb dos tons de gris (quina gràcia...). Ara si, està perfecte, només va fer falta netejar-la.

Because of the state of the seat pad the mat was full of small pieces of the pad underneath the seat, so I stick a piece of plastic bag to keep it clean.

Vaig col·locar un tros de bossa sota el seient perquè no caiguéssin trossets de farcit a l'alfombreta.

Removing squares / Borrant quadres

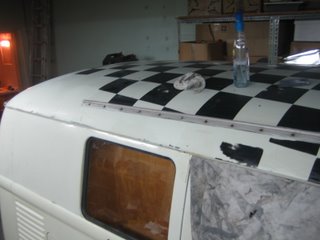
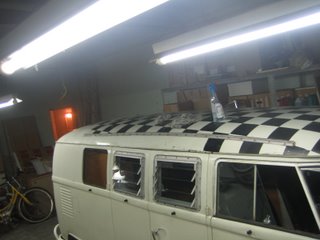
We don't like the chess board on the roof... so we started to remove the squares. Wet sanding paper, water and patience is all you need to do the job. The PO's PO sanded all the old red roof and let the OG pearl white shine... Then the PO painted the squares. Now What you see is OG paint, at some pionts you could see the primer under the Pearlwhite L87.

El taulell d'escacs del sostre no ens acababa d'agradar... així que vam començar a borrar quadres. Lija a l'aigua, aigua i paciència és tot el que es necessita per fer-ho. El paio que la va importar de USA va lijar tot el sostre vermell deixant a la vista la pintura original, llavors al que li vam comprar nosaltres va pintar els quadres. Ara el que queda a la vista és la pintura original, a alguns lloca es veu la imprimació sota del color Pearlwhite L87.